Preparing Your Air Conditioning System for Winter
Your home is a huge investment. As the seasons change, there are steps you can take to ensure that parts of your investment are not put at risk when they are not in use. For example, winterizing your air conditioning system will keep you from having large replacements when spring and summer come back around. We’ve included a few steps you can take as a homeowner to keep you’re A/C in the best shape, so it lasts. It’s better to do this type of outdoor task before the weather changes and snow or the temperature begins to fall.
Reasons to Winterize Your Air Conditioning Unit
Maybe you’re thinking “air conditioning units are MEANT to be outside, why would I need to prepare it for the changing of season?” and the answer is simply—it takes little time and extends the life of your unit, saving money overall.
Water, ice and debris collect in and around your unit during the fall and winter. If your air conditioner is not protected, it can clog, rust and deteriorate quicker than a unit that is protected. Air conditioning systems are expensive and after investing in a home, of course you want it to last as long as possible. Ignoring your air conditioning unit all winter could lead to costly repairs or the need to replace the entire unit when spring and summer begin.
Supplies needed include: a clean rag, waterproof cover, Bungee cords, vinyl rope or plywood and brick, foam pipe covers and duct tape.
Winterizing for Colder Environments
Clean the Unit
On a day that isn’t too cold or wet yet, you will want to take a wet rag and wipe out all the debris or dirt that has accumulated all year. Let it dry before you continue the process.
Turn the Unit Off
Shut off the power by going to the outdoor system and finding the on/off switch which is typically located under a metal or plastic lid. Flip the switch to the off position. Be sure to turn the actual unit off and not just switch the thermostat because if the room in your home warms up at all, the A/C will likely switch back on to cool it off. When the unit turns on in the winter, water may get pulled into the coils of the unit and freeze, leading your AC to corrode or rust.
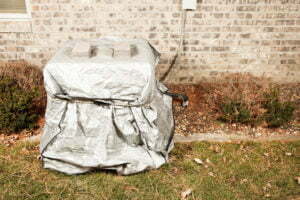
Cover the Unit
Before you wrap your air conditioner for the winter, make sure it’s dry. Then cover the unit with a plastic or vinyl cover, made for protecting outside air conditioning systems or use a tarp. If you do choose to use a tarp, make sure that it’s big enough to cover the entire unit. The winterizing needs to withstand strong winds so consider using bungee cords or vinyl rope to secure the cover. If you’d prefer to use a piece of plywood and a brick, that may work as well.
Insulate the Pipes
This is an important step! Without proper coverage, your pipes can freeze and burst when temperatures drop. Protect your pipes with foam pipe covers. Begin by taking foam covers and cover the corners of your pipes. There are elbow-shaped foam covers made with adhesive to make this easier. After covering the corners, cover the rest of the pipe snugly. Use duct tape to secure any loose foam on the pipes. Foam can stay on the pipes all year so if the pipes are adequately covered, you have one less step next year!
Check It Out
You’re done. If you experience bad weather, check and make sure everything is still intact. Each time you check it, you should brush off any snow, ice or water that may have collected on top of the cover. Be sure to remove any debris and keep all animals away from the area. Adjust the cover if needed and rest easy knowing you’ve winterized your unit well.
Winterizing for Warmer Environments
It’s still good to clean your unit and turn off the power, but you won’t need to cover your air conditioner or pipes. You won’t cover your unit because of the possibility that mold or mildew may grow underneath the cover due to excess moisture. If any kind of fungi builds on your coils, it will block airflow and make your unit less efficient. Follow steps one and two and you’re done.


